最終更新日: 2019年6月16日

Webをバランシングする

1. environment / 環境

Webサーバのロードバランサとしての利用を想定します。 構成は以下のような構成とします。

2. pre-setting / 前準備

HAProxyおよびSquidをRedhat/CentOS系で構築する場合、SELinuxとFirewalldの設定を予め済ませておくと良いでしょう。
  1. SELinuxの設定
SELinuxはデフォルトで有効になっているのでこれを無効化します。(Squid、HAProxy)
# setenforce 0
また、OSの再起動時にSELinuxが設定されないように /etc/sysconfig/selinux の以下の部分を修正します。
# SELINUX=enforcing
SELINUX=disabled
# SELINUXTYPE= can take one of three values:
# targeted - Targeted processes are protected,
# minimum - Modification of targeted policy. Only selected processes are protected.
# mls - Multi Level Security protection.
SELINUXTYPE=targeted


  1. Firewalldの設定
ファイアーウォール機能(デフォルトは有効になっている)を使っている場合には、Squid、HAProxyのそれぞれのサーバで待ち受けポートへのアクセスを許可するようにルールを設定します。
(1) Apacheの場合
http用のファイアーウォールルールは、/usr/lib/firewalld/services/http.xml と https.xml としてデフォルトで用意されています。 このルールを適用します。
# firewall-cmd --add-service=http --zone=public --permanent
# firewall-cmd --add-service=https --zone=public --permanent
# systemctl reload firewalld
(2) HAProxyの場合
HAProxyでは、Firewall用のルールファイルがデフォルトで存在しないので、Ssquid用のルールファイルをコピーしてHAProxy用に編集します。
# cp /usr/lib/firewalld/services/squid.xml /etc/firewalld/services/haproxy.xml
コピーした /etc/firewalld/services/haproxy.xml を次のように書き換えます。
<?xml version="1.0" encoding="utf-8"?>
<service>
    <short>haproxy</short>
    <description>haproxy Load Balancer</description>
    <port protocol="tcp" port="80"/>
    <port protocol="tcp" port="443"/>
    <port protocol="tcp" port="8080"/>
    <port protocol="tcp" port="8888"/>
</service>
このルールは、80/TCP、443/TCP、8080/TCP と 8888/TCP のアクセスを許可するようになっています。 作成したルールを適用します。
8080/TCPは、Squid(Proxy)用のルールで、別の章で使うルールですが、ルールの共通化ののために定義しておきます。
# firewall-cmd --add-service=http --zone=public --permanent
# firewall-cmd --add-service=https --zone=public --permanent
# firewall-cmd --add-service=haproxy --zone=public --permanent
# systemctl reload firewalld

3.Apache configuration / Apacheの設定

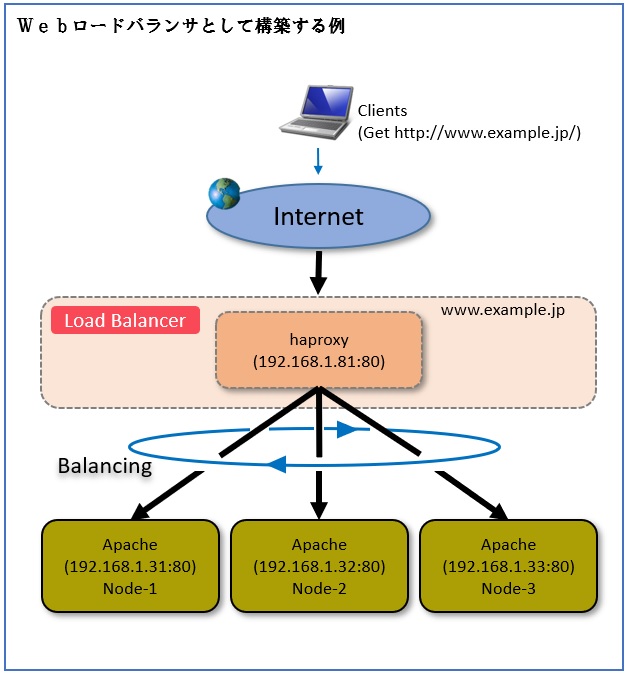
HAProxy経由でWebサーバにアクセスされた場合、アクセス元IPアドレスはすべてHAProxyのIPアドレスになってしまい、本来のアクセス元を確認することができません。
そこで、ApacheでHAProxy経由のログについて、ソースIPをX-Forwarded-forで記録するようにします。
編集するのは、Debia系では "/etc/apache2/apache2.conf" 、RHEL/CentOS系では "/etc/httpd/conf/httpd.conf" となります。
■ 設定項目
   :
<IfModule log_config_module>
     #
     # The following directives define some format nicknames for use with
     # a CustomLog directive (see below).
     #
     LogFormat "%h %l %u %t \"%r\" %>s %b \"%{Referer}i\" \"%{User-Agent}i\"" combined
     LogFormat "%h %l %u %t \"%r\" %>s %b" common
     # Add Lof format
     LogFormat "%{X-Forwarded-For}i %l %u %t \"%r\" %>s %b \"%{Referer}i\" \"%{User-Agent}i\"" combined-xff
     # SetEnvIf X-Forwarded-For "^.*\..*\..*\..*" forwarded

     # check X-Forwarded-for
     SetEnvIf X-Forwarded-For "^(([0-9]+\.[0-9]+\.[0-9]+\.[0-9]+)|(\[([0-9a-f]+)?:([0-9a-f:]+)?:([0-9a-f]+|0-9\.]+)?\]))" forwarded

     <IfModule logio_module>
          # You need to enable mod_logio.c to use %I and %O
         LogFormat "%h %l %u %t \"%r\" %>s %b \"%{Referer}i\" \"%{User-Agent}i\" %I %O" combinedio
     </IfModule>
     #
     CustomLog "logs/access_log" combined env=!forwarded
     CustomLog "logs/access_log" combined-xff env=forwarded
</IfModule>
   :

4.HAProxy configuration / HAProxyの設定

HAProxyでは、フロントエンドであるHAProxyがクライアントPCからの待ち受けをし、バックエンドにある3台のWebーバへロードバランシングを行うようにする。 ロードバランスの方式として単純なラウンドロビンで行ってしまうと、SSLセッションの維持ができなくなる可能性が高いので、バランシング方式はソースIPアドレスを使ったハッシュバランス方式とする。
/etc/haproxy/haproxy.cfg を以下のように設定する。
#---------------------------------------------------------------------
# Global settings
# グローバル設定では、システムに影響する全体的な設定を行います。
#---------------------------------------------------------------------
global
     log 127.0.0.1 local2

     chroot /var/lib/haproxy
     pidfile /var/run/haproxy.pid
     maxconn 30000 # --- 最大接続セッション数を指定
     user haproxy
     group haproxy
     daemon

     # turn on stats unix socket
     stats socket /var/lib/haproxy/stats

#---------------------------------------------------------------------
# common defaults that all the 'listen' and 'backend' sections will
# use if not designated in their block
# デフォルト設定は、この後に設定する各'listen'や'backend'といったセクションの
# デフォルト値を設定します。
#---------------------------------------------------------------------
defaults
     mode http # --- モードはhttp(パケット)モードとします。
     log global
     option httplog
     option dontlognull
     option http-server-close
     option forwardfor except 127.0.0.0/8
     option redispatch
     retries 3
     timeout http-request 10s
     timeout queue 1m
     timeout connect 10s
     timeout client 1m
     timeout server 1m
     timeout http-keep-alive 10s
     timeout check 10s
     maxconn 10000 # --- 同時接続セッション数です。グローバルで指定した数を超えないようにします。

#---------------------------------------------------------------------
# フロントエンド(待ち受け)に関するセクションです。
#---------------------------------------------------------------------
frontend haweb
     # 待ち受けポートを指定します。
     bind *:80
     # bind *:443 ssl crt /etc/haproxy/haproxy_server.pem
     # acl url_static path_beg -i /static /images /javascript /stylesheets
     # acl url_static path_end -i .jpg .gif .png .css .js

     # use_backend static if url_static
     # default_backend app
     option httpclose
     option forwardfor # --- X-Forwarded-for ヘッダを処理します。
     default_backend back_web # --- 'back_proxy'として定義したバックエンドにパケットを渡します。

     # これ以外の設定は、デフォルト設定に従います。

#---------------------------------------------------------------------
# static backend for serving up images, stylesheets and such
#---------------------------------------------------------------------
# backend static
#     balance roundrobin
#     server static 127.0.0.1:4331 check

#---------------------------------------------------------------------
# バックエンドとして、フロントエンドで受け取ったパケットを転送する相手の情報を
# 設定します。
#---------------------------------------------------------------------
backend back_web # --- 'back_web'という名前でバックエンドを定義します。
     # balance roundrobin
     balance source # --- ソースIPを基にしたバランシングを行います。
     # 以下は、転送先の相手の情報です。 バックエンドは死活監視します。
     # これ以外の設定は、デフォルト設定に従います。
     server web1 192.168.10.31:8080 check
     server web2 192.168.10.32:8080 check
     server web3 192.168.10.33:8080 check
     # server web1 192.168.10.31:443 check ssl verify none
     # server web2 192.168.10.32:443 check ssl verify none
     # server web3 192.168.10.33:443 check ssl verify none

#---------------------------------------------------------------------
# ステータス情報表示用Webページを表示させるための設定
# アクセスは
#     http://HAProxyのIPアドレス:8888
#     ログインID: admin
#     パスワード: P@ssword
#---------------------------------------------------------------------
listen stats
     bind :8888
     mode http
     maxconn 10
     stats enable
     # stats hide-versionsystemc
     stats refresh 10s
     stats show-node
     stats auth admin:P@ssword
     stats uri /


5.editing HOSTS file / HOSTSファイルの設定

HAproxyおよび各Squid Proxyサーバでは、DNSの名前解決ができなくても相手が見つかるようにそれぞれの /etc/hosts を以下のように設定しておきます。
#
127.0.0.1 localhost localhost.localdomain
::1 localhost localhost.localdomain

#
192.168.10.81 haproxy haproxy.example.jp

# Proxys
192.168.10.31 node1
192.168.10.32 node2
192.168.10.33 node3

参考: