(1). c-icapのインストール
最初に以下の手順でc-icapをインストールします。
# apt-get install c-icap
(2). Apacheのインストール
squidclamav
ではウイルスを検知すると、それをWebサーバを使って知らせてくるので、Webサーバの構築が必要になります。
debianでは
# apt-get install
apache2
で環境が整います。もしUbuntu 14.04以上を使うなら apache2 のインストール後に以下の作業が必要です。
- CGIが利用できるようにApacheにモジュールを追加
# a2enmod cgid
- CGIを実行できるディレクトを指定
/etc/apache2/sites-enabled/000-default.conf
を開き、以下のディレクティブを追加します。
<VirtualHost *:80>
# The ServerName directive sets the request scheme, hostname and
port that
# the server uses to identify itself. This is
used when creating
# redirection URLs. In the context of virtual
hosts, the ServerName
# specifies what hostname must appear in the
request's Host: header to
# match this virtual host. For the default
virtual host (this file) this
# value is not decisive as it is used as a last
resort host regardless.
# However, you must set it for any further
virtual host explicitly.
#ServerName www.example.com
ServerAdmin webmaster@localhost
DocumentRoot /var/www/html
# Available loglevels: trace8, ..., trace1,
debug, info, notice, warn,
# error, crit, alert, emerg.
# It is also possible to configure the loglevel
for particular
# modules, e.g.
#LogLevel info ssl:warn
ScriptAlias /cgi-bin/ /usr/lib/cgi-bin/
<Directory
"/usr/lib/cgi-bin">
AllowOverride None
Options +ExecCGI -MultiViews +SymLinksIfOwnerMatch
Order allow,deny
Allow from all
</Directory>
ErrorLog ${APACHE_LOG_DIR}/error.log
CustomLog ${APACHE_LOG_DIR}/access.log combined
# For most configuration files from
conf-available/, which are
# enabled or disabled at a global level, it is
possible to
# include a line for only one particular virtual
host. For example the
# following line enables the CGI configuration
for this host only
# after it has been globally disabled with
"a2disconf".
#Include conf-available/serve-cgi-bin.conf
</VirtualHost>
(2). squidclamavジュールのインストール
squidclamav はパッケージが存在しないので、ソースファイルからコンパイルする必要があります。
其の為には、最初に開発環境等をインストールしておく必要があるので以下のコマンドを実行して開発環境を整えます。
# apt-get install
build-essential
# apt-get install curl
libcurl4-gnutls-dev c-icap libicapapi-dev
# apt-get install apache2
# --- ウイルス発見時の画面表示のためにWWWサーバを用意
もし、利用しているOSがUbuntu 14.04以上の場合、デフォルトではCGIが動作しないため、
squidclamav をダウンロードサイトからソースファイルをダウンロードして解凍します。
# wget
http://sourceforge.net/projects/squidclamav/files/latest/download -O
squidclamav.tar.gz
# tar zxvf squidclamav.tar.gz
# cd squidclamav-xx.xx
ソースファイルをコンパイルします。
# ./configure
# make
# make install
# cp cgi-bin/clwarn.cgi /usr/lib/cgi-bin/
# --- ウイルス発見時の検知画面
(3) ICAPを経由してsquidclamavをアクセスするように設定
/etc/squidclamav.conf を編集していきます。 /etc/squidclamav.conf
はデフォルトでは存在しませんが
/etc/c-icapディレクトリにある筈ですのでこれを使います。
# ln -s
/etc/c-icap/squidclamav.conf /etc/squidclamav.conf
/etc/squidclamav.conf を編集します。
::
# When a virus is found then redirect the user to this URL
# redirect http://proxy.domain.dom/cgi-bin/clwarn.cgi
redirect http://proxy.example.jp/cgi-bin/clwarn.cgi
# ----- Apache2 をインストールしたマシン
::
# Path to the clamd socket, use clamd_local if you use Unix socket or if
clamd
# is listening on an Inet socket, comment clamd_local and set the clamd_ip
and
# clamd_port to the corresponding value.
# clamd_local /var/run/clamav/clamd.ctl
clamd_local /var/run/clamav/clamd.ctl # ----
clamav-daemon.confで確認した「LocalSocket」の値と同じことを確認する
::
/etc/c-icap/c-icap.conf
を編集して、squidclamavモジュールを利用できるようにします。
::
# Default:
# ServerAdmin you@your.address
ServerAdmin root@example.jp
# --- 管理者のメールアドレス
::
# Default:
# No value
# ServerName YourServerName
ServerName proxy.example.jp
# --- サーバのFQDN名
::
::
# Example:
# Module logger sys_logger.so
# squidclamav
Service squidclamav squidclamav.so
::
(4) SquidからICAPを呼び出せるよう設定する
/etc/squid3/squid.conf
を編集して、SquidからICAPサーバを呼び出せるようにします。(以下での設定はICAPに関する部分のみとなります。設定前に、通常のProxyとして動作するよ
うに設定を完了しておいてください)
::
#
logformat icap_squid [%tl] %icap::tr %>a
%icap::to/%03icap::Hs %icap::<st %icap::rm %icap::ru %un
-/%icap::<A -
icap_log /var/log/squid3/icap.log icap_squid
::
#Default:
# icap_enable off
icap_enable on
::
Default:
# icap_send_client_ip off
icap_send_client_ip on (Squid 3.2以後は、adaptation_send_client_ip にディレクティブ名が変更されています)
::
#Default:
# icap_send_client_username off
icap_send_client_username on (Squid 3.2以後は、adaptation_send_username にディレクティブ名が変更されています)
::
#Default:
# icap_client_username_header X-Client-Username
icap_client_username_header X-Client-Username
::
#Default:
# none
icap_service service_req reqmod_precache bypass=1
icap://127.0.0.1:1344/squidclamav
icap_service service_resp respmod_precache bypass=1
icap://127.0.0.1:1344/squidclamav
#Default:
# none
adaptation_access service_req allow all
adaptation_access service_resp allow all
::
c-icapサーバがシステム起動時に自動的に実行されるように /etc/default/c-icap
を編集します。
# Defaults for c-icap initscript
# sourced by /etc/init.d/c-icap
# installed at /etc/default/c-icap by the maintainer scripts
# Should c-icap daemon run automatically on startup? (default: no)
START=yes
# Additional options that are passed to the Daemon.
DAEMON_OPTS=""
以上で、設定は完了です。 システムを再起動するか以下のコマンドを実行してサービスを再起動します。
# service c-icap
restar
# service squid3 restart
(5) 開発環境の削除
利用した開発環境を残しておくのはセキュリティ上好ましくないので削除しておきます。
# apt-get remove
build-essential
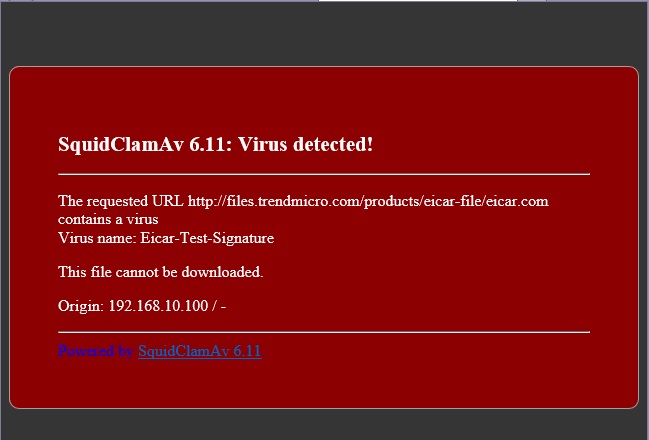
(6) 確認
設定が完了したらブラウザでProxyを利用するように設定を行い、テスト用ウイル
ス"http://files.trendmicro.com/products/eicar-file/eicar.com"にアクセスしてみてください。
以下のような画面が表示されれば正常に機能しています。